The cycle finished and the machine went quiet, but the bottom of your KitchenAid dishwasher is still full of standing water. Whether your KitchenAid dishwasher is not draining at all, leaving water in the basin after every cycle, or has never drained properly since it was installed, this guide covers every cause we see in Halifax. KitchenAid dishwashers are built on the Whirlpool platform, which means the diagnostic process and repair steps are consistent across both brands. This guide covers the KitchenAid-specific filter designs and the Whirlpool-platform locking tab drain pump system.
- Clogged filter and sump area (most common, free to fix)
- Blocked or kinked drain hose
- Garbage disposal knockout plug not removed (common after new installations)
- Failed drain pump
- Control board fault
KitchenAid dishwashers come in two filter configurations depending on model year. Newer models use a tool-free twist-out filter similar to Whirlpool. Older models require a screwdriver or have a different access mechanism. Both are covered in Cause 1 below.
Mapleland Appliance is a locally owned appliance repair company in Halifax, NS. We write these guides from real repair experience to help you diagnose the problem yourself, and we are available for same-day service across HRM when you need a hand.
✓ I want to try fixing it myself
Read on. This guide walks you through all 5 causes in order of likelihood, with step-by-step instructions and the tools you need.
📞 I’d rather have a technician handle it
No problem. We service KitchenAid dishwashers across Halifax and HRM. Same-day appointments available. $89.9 flat diagnostic fee.
Safety notice: These guides are for informational purposes only. Appliance repair involves electrical and water hazards. Always disconnect power and shut off the water supply before starting any work. If you are unsure about any step, stop and call a technician. Mapleland Appliance is not liable for injury or damage resulting from DIY repair attempts.
5 Most Common Causes of a KitchenAid Dishwasher Not Draining
| Component | DIY Difficulty | Est. Cost (CAD) |
|---|---|---|
| Clogged Filter and Sump Area | ⭐ Easy | $0, DIY clean |
| Blocked or Kinked Drain Hose | ⭐ Easy | $0–$15 replacement hose |
| Garbage Disposal Knockout Plug | ⭐ Easy | $0, DIY remove |
| Failed Drain Pump | ⭐⭐⭐ Hard | Part $50–$120, total $140–$220 with labour |
| Control Board Fault | ⭐⭐⭐ Hard | From $200 total with labour |
* Prices shown are estimates only. Actual costs may vary depending on your model and parts availability. Call us for a quote before you decide.
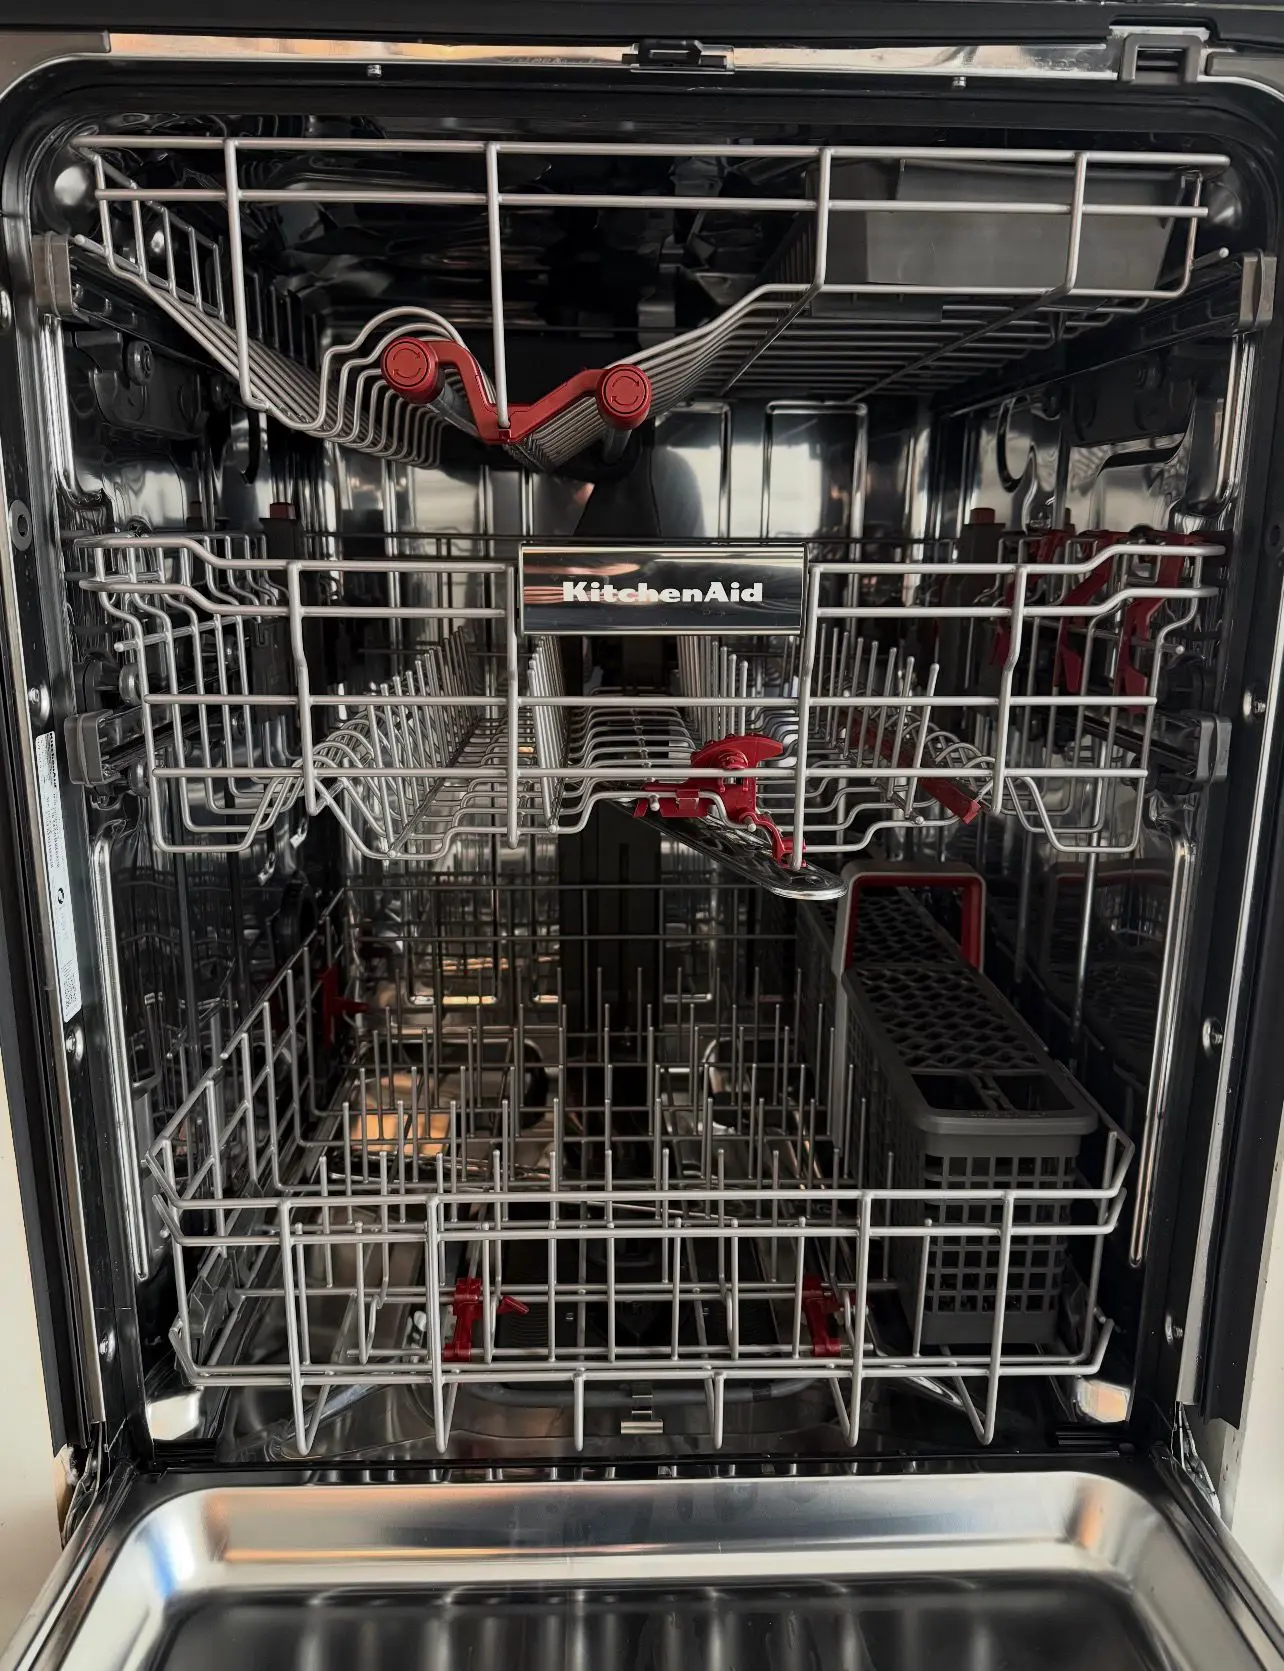
Clogged Filter and Sump Area
What it is: KitchenAid dishwashers collect food debris, grease, and mineral deposits in a filter assembly at the base of the tub. When this filter clogs, water cannot pass through to the drain pump and sits in the basin after every cycle. This is the first thing to check on any KitchenAid dishwasher that is not draining, because it is free to fix and takes about ten minutes once you know your filter type.
Health Canada’s safe food handling guidelines recommend that all utensils and dishware used with raw food be cleaned thoroughly before reuse. A dishwasher with a clogged filter cannot clean effectively, as food particles and bacteria accumulate in the sump area and can transfer back onto dishes during the wash cycle. In Halifax, we recommend cleaning the filter every three weeks. Nova Scotia’s water supply carries higher mineral content than most inland Canadian cities, and that calcium combines with food residue and detergent to block the filter mesh faster than standard cleaning intervals assume.
KitchenAid makes two different filter configurations. Check which type you have before starting:
Newer KitchenAid models (tool-free): The filter system is identical to Whirlpool’s design. The cylindrical inner filter rotates counter-clockwise and lifts straight out. No tools required. The cleaning process is the same as described in our Whirlpool dishwasher not draining guide.
Older KitchenAid models: The filter access mechanism differs from the newer tool-free design and may require a screwdriver or have a different retaining structure. If your filter does not twist out by hand, refer to the video below which covers the older filter access process.
Symptoms:
- Standing water in the bottom of the tub after every cycle
- Dishes coming out with a gritty film or food particles still attached
- Musty smell from inside the dishwasher between uses
- Draining has become progressively slower over several weeks
- Unplug the dishwasher and remove the bottom rack.
- Locate the filter assembly at the centre bottom of the tub. On newer models, grip the cylindrical inner filter and rotate counter-clockwise until it releases, then lift straight out. On older models, follow the access steps shown in the video below.
- Rinse the filter under warm running water. Use a soft brush or toothbrush to scrub the mesh. For calcium buildup, soak in undiluted white vinegar for 15 minutes before scrubbing.
- Look into the sump cavity and wipe out any visible debris with a damp cloth.
- Reinstall the filter, replace the rack, plug in, and run a short rinse cycle to confirm drainage.
This video covers the filter cleaning process on older KitchenAid dishwasher models:
Blocked or Kinked Drain Hose
What it is: The drain hose carries water from the pump to a standpipe or garbage disposal under the sink. A sharp kink anywhere along the hose or a grease buildup inside it stops water flow entirely. The pump runs but nothing drains. This problem most often appears after the dishwasher has been moved, or when new cabinetry has been installed around it.
Under the Nova Scotia Building Code, dishwasher drain connections must maintain specific clearance and depth requirements to prevent backflow. In older Halifax and Dartmouth apartments, standpipes are often narrower than current code requires. If the drain hose is inserted more than 7 inches (18 cm) into the standpipe, it creates a siphon effect that either prevents draining or pulls dirty water back into the tub between cycles. This costs nothing to fix once identified.
Symptoms:
- Pump runs audibly but water level does not drop
- Problem appeared after the dishwasher was moved or kitchen work was done
- Dirty water reappears in the tub between cycles
- Shut off power at the breaker and the water supply valve under the sink.
- Open the cabinet under the sink and trace the drain hose from the dishwasher to its connection point.
- Check the full length of the hose for sharp bends or kinks, particularly where it passes through cabinet walls.
- Confirm the hose has a high loop, rising up to the underside of the counter before descending to the drain. A hose running straight down without looping will siphon water back into the tub.
- If connecting to a standpipe, confirm the hose is not inserted more than 7 inches into the pipe.
- Disconnect the hose and pour water into the open end to confirm free flow. A blocked hose needs to be cleared or replaced.
- Reconnect, restore power and water, and run a test cycle.
Garbage Disposal Knockout Plug Not Removed
What it is: If your KitchenAid dishwasher was recently installed and has never drained properly from the first use, check for a garbage disposal knockout plug before assuming any component has failed. According to KitchenAid’s official product support guide, removing the garbage disposer knockout plug is a critical installation step that is frequently missed. When a dishwasher drain hose connects to a garbage disposal, there is a factory-installed plastic plug inside the disposal’s dishwasher inlet port that must be knocked out before the hose is connected. If an installer skips this step, water from the dishwasher has nowhere to go.
The full knockout plug removal process is identical across all dishwasher brands and is covered in detail in our Frigidaire dishwasher not draining guide and our Whirlpool dishwasher not draining guide.
Symptoms:
- Dishwasher has never drained since it was installed
- A garbage disposal was installed at the same time as the dishwasher
- Wash cycle runs normally but drain cycle produces no water movement
- Shut off power to both appliances at the breaker.
- Under the sink, locate the garbage disposal’s dishwasher inlet port on the side of the unit.
- Disconnect the drain hose from the inlet port.
- Shine a flashlight into the inlet port. A solid plastic disc blocking the opening confirms the knockout plug is still in place.
- Insert a screwdriver handle or wooden dowel into the port and tap firmly with a hammer to knock the plug into the disposal chamber.
- Remove the knocked-out plug from inside the disposal bowl before reconnecting anything.
- Reconnect the drain hose, restore power, and run a full cycle.
Failed Drain Pump
What it is: The drain pump uses an electric motor to push water out of the sump and through the drain hose. When it fails, water stays in the basin regardless of how many cycles you run. A jammed impeller produces a grinding or humming sound during the drain phase. A burned-out motor is completely silent when the drain cycle should be running.
KitchenAid dishwashers use the same Whirlpool-platform drain pump design, which includes a locking tab system. The pump body seats into a circular port in the sump and is secured by a plastic retaining tab. To remove the pump, the machine must be pulled out from under the counter, disconnected from its 120V hardwired power supply and water inlet, and tilted backward to access the pump from underneath. Once accessible, press the locking tab inward and rotate the pump body approximately one quarter turn counter-clockwise to release it. The pump will pull straight out once the tab is fully released. Rotating the pump without first fully pressing the tab inward will not work and risks snapping the tab.
Symptoms:
- Grinding or humming during the drain cycle with no water movement (jammed impeller)
- Complete silence during the drain phase where pump noise is expected (burned-out motor)
- Filter is clean and hose is clear, but machine still will not drain
This video covers the KitchenAid dishwasher drain pump removal and replacement process including the locking tab release:
Control Board Fault
What it is: The control board sends the electrical signal that activates the drain pump at the correct point in each cycle. If the board fails to send that signal, the pump receives no power and the machine sits with a full basin of water after every cycle. The wash phase may run normally and no obvious mechanical fault is present.
This is the last cause to consider because it is the least common and the most expensive. Work through Causes 1 through 4 before concluding the board is the problem.
Symptoms:
- All components test as functional but the drain pump never activates
- Machine stalls at the same point in every cycle with no error code
- Multiple unrelated error codes appearing together
KitchenAid Dishwasher Error Codes and Drain Faults
KitchenAid dishwasher error codes vary by model year and control board generation, as the brand spans multiple Whirlpool platform generations. Older KitchenAid models with mechanical controls display no error codes. Newer models with digital displays may show drain-related codes, but the format depends on your specific model. If your KitchenAid dishwasher is displaying an error code, call us with the code and your model number and we can advise over the phone before you book anything.
Should You Repair or Replace Your KitchenAid Dishwasher?
According to the Insurance Bureau of Canada, water damage from household appliances is one of the leading causes of home insurance claims across Atlantic Canada, with dishwashers among the most common sources. A KitchenAid dishwasher that is not draining puts ongoing stress on the pump, hoses, and door seals. Addressing the fault promptly prevents a small drain issue from becoming a water damage claim.
Rule 1: The 50% Rule. If the total repair cost (parts plus labour) exceeds 50% of the price of a comparable new KitchenAid dishwasher, replacement is usually the better long-term financial decision.
Rule 2: The Lifespan Rule. KitchenAid dishwashers typically last 10–13 years with regular maintenance. If your machine is under 7 years old, repair almost always makes sense. Over 10 years old with a major component failure, replacement deserves serious consideration.
Rule 3: The Recurring Failure Rule. If this is the second or third component failure within 18 months, the machine is in general decline. Isolated failures are normal. A pattern of failures is not.
At Mapleland Appliance, we assess the dishwasher, explain exactly what has failed, give you a clear repair quote, and tell you honestly whether fixing or replacing makes more financial sense. No pressure either way. Call us and we will tell you straight.
Frequently Asked Questions
How much does it cost to fix a KitchenAid dishwasher not draining in Halifax?
It depends on the cause. Cleaning a clogged filter costs nothing and takes about ten minutes once you know your filter type. A drain hose adjustment or replacement runs $0–$25 in parts. Removing a missed disposal knockout plug is free. A drain pump replacement starts from around $140–$220 total with labour. At Mapleland Appliance, our diagnostic fee is $89.9 and we give you a clear quote before any work begins.
How do I manually drain a KitchenAid dishwasher?
KitchenAid dishwashers do not have a dedicated emergency drain hose. To remove standing water manually, open the door and use a cup or ladle to bail water out into a bucket. A wet-vac inserted into the bottom of the tub is faster and more thorough. Once the tub is empty, clean the filter and sump area thoroughly. This cleaning step alone resolves the problem in many cases. Do not run another cycle until you have identified why the water did not drain the first time.
My KitchenAid dishwasher is new and has never drained properly. What should I check first?
If your KitchenAid dishwasher has never drained correctly since installation and it connects to a garbage disposal, check for the disposal knockout plug first. As KitchenAid’s own support documentation confirms, this is one of the most common causes of a newly installed dishwasher not draining. The plug is a plastic disc inside the disposal’s dishwasher inlet port that must be knocked out before the drain hose is connected. It is a required installation step that gets missed regularly when a disposal and dishwasher are installed in the same visit. Full removal steps are in Cause 3 above. If the plug is absent or removing it does not fix the problem, confirm the drain hose has a proper high loop under the counter and is not inserted too deeply into the standpipe.
How often should I clean my KitchenAid dishwasher filter in Halifax?
Every three weeks, rather than the standard monthly recommendation. Halifax’s municipal water supply has higher mineral content than most inland Canadian cities, and that calcium combines with food residue and detergent to clog the filter mesh faster than the manufacturer’s maintenance schedule assumes. A filter clean takes about ten minutes on newer tool-free KitchenAid models. Regular cleaning also extends the life of the drain pump by reducing the debris load it handles on every cycle.
KitchenAid Dishwasher Repair in Halifax, NS
If your KitchenAid dishwasher is not draining and the repair is beyond a comfortable DIY fix, Mapleland Appliance is a locally owned appliance repair company serving Halifax and the surrounding HRM communities. We provide dishwasher repair in Halifax and across the region, with same-day and next-day appointments available.
We service KitchenAid dishwashers across Halifax, Dartmouth, Bedford, and surrounding areas. We carry common Whirlpool-platform drain pump assemblies compatible with KitchenAid models, and complete most repairs in a single visit.
Mapleland Appliance
📞 (782) 409-2734
📍 Serving Halifax, Dartmouth, Bedford, Sackville, and Cole Harbour, NS
💰 $89.9 diagnostic fee, clear pricing with no hidden costs
🕐 Same-day and next-day appointments available
KitchenAid Dishwasher Not Draining?
We diagnose the problem clearly, give you an upfront quote, and fix it fast. Or tell you honestly if it is not worth repairing.
Same-day and next-day appointments across Halifax and HRM.